Pages

Monday, February 24, 2014

Sweet and Spicy Steamed Carrots

A super quick, easy, and spicy side dish made with a few simple ingredients.  


Ingredients
Serves 2

  • 1/2 lb of carrots (about 6-8 medium carrots)
  • 1 Tbs Pure Maple Syrup
  • 1/8 tsp cayenne pepper

  1. Wash, trim, peel, and chop the carrots.
  2. Steam carrots in the microwave or on the stove top until they are tender.  About 5 minutes.
  3. Mix in a bowl with the maple syrup and cayenne pepper making sure carrots are evenly coated and seasoned. 


Lunch Ideas - Ginger Miso Noodle Soup


Trader Joe's has a new Ginger Miso broth I've been wanting to try.  I used it today and came up with this easy soup.  I made my own baked tofu, but you can make this recipe even easier by picking up a brick of savory baked tofu from TJ's too.

I used one full carton of TJ's Ginger Miso Broth.  I made a simple baked tofu by pressing a brick of extra firm tofu and marinating it with some soy sauce, olive oil, maple syrup, cayenne, and garlic powder.  Cut into cubes and bake at 425 degrees for about 40 minutes. 

I used used half a package of Nasoya Udon Noodles and prepared them as directed.  I sliced a handful of mushrooms and added them to the broth along with the tofu cubes, some chopped green onions, and the udon noodles.   Heat through and serve.   This made for a very filling soup for two people.

Instagram Roundup


Sunday, February 23, 2014

Easy Vegan Scalloped Potatoes


Ingredients

  • 1/4 c raw cashews, soaked for 2+ hours and drained
  • 1 garlic clove
  • 1 tsp salt
  • 1/4 tsp onion powder, heaping
  • 1/4 tsp garlic powder, heaping
  • 2 Tbs nutritional yeast
  • 1/8 tsp freshly ground black pepper
  • 1 T olive oil
  • 1 cups water + 3 Tbs water
  • 1 cup vegetable stock
  • 5 medium potatoes, washed and peeled
  • smoked paprika

  1. Preheat oven to 350 degrees.
  2. In a high speed blender, blend cashews, 3 Tbs water, 1 garlic clove, onion powder, garlic powder, nutritional yeast, pepper, and olive oil until smooth.
  3. Add in 1 cup of water and 1 cup of vegetable stock to the mixture and blend til evenly smooth again.
  4. Using a mandoline or by hand, slice the potatoes thinly and evenly.
  5. Spray a 9x13 glass baking dish with cooking spray.
  6. Place the potatoes in the baking dish and pour the liquid mixture over them.  Give it a stir to evenly distribute the liquid.
  7. Cover with foil and bake for 45 minutes.
  8. Uncover the dish, raise the oven temp to 400 degrees and bake for 30-40 minutes or until the tops and edges start to brown.
  9. Sprinkle with smoke paprika and serve.


It's So Easy I Couldn't Believe It Seitan


I always thought making seitan from scratch must be really hard and difficult.  Then I learned about this awesome trick of steaming the seitan instead of boiling it.  I've used the basic seitan recipe found on the package of Bob's Red Mill Vital Wheat Gluten and made a few adjustments of my own for added flavor.  Steaming the seitan results in a lighter texture then I think you get from store bought seitan which I've never really enjoyed.  


This is a super basic version that can be used for a variety of different recipes.  Try marinating the seitan and baking it or using them as cutlets for a seitan parmesan.  Make this homemade seitan and slice it for sandwiches, make it gyro style, or grind it to use as a ground beef replacement for meatless balls.  1/4 c of wheat gluten is 23g of plant based protein, whoa!


Ingredients
Makes 2 "Cutlets"

  • 1 c vegetable stock
  • 1/2 tsp Garlic Powder
  • 1/2 tsp onion powder
  • 1/2 tsp coriander
  • 1/4 tsp sage
  • 2 Tbs Nutritional Yeast
  • ground pepper and salt to taste
  • 3/4 c Vital Wheat Gluten
  • 1/4 c Chickpea Flour

  1. Thoroughly mix all dry ingredients together in a mixing bowl.
  2. Add in the vegetable stock and stir.  A dough will quickly form.
  3. Using your hands, knead the dough for about 3 minutes to form a tougher consistency.
  4. Tear off a sheet of heavy duty aluminum foil about 1 ft x 1 ft.
  5. Split the two into two even pieces.  Place each one in the center of the foil and flatten into a "cutlet" type shape about 6 in. long.
  6. Fold the aluminum into a steaming packet by folding as show in the photo above.  Bring the two horizontal edges together and seal along the top.  Fold up the side edges while leaving some space above the dough.  The cutlets will expand a little when cooked.
  7. Steam for 30-40 minutes or until the seitan feels firm.
  8. Do not open the foil packets and chill them in the refrigerator for at least 30 minutes in the refrigerator to firm up the texture.


Friday, February 14, 2014

Cinnamon Coconut Sugar Apple Chips


I've been experimenting with my new dehydrator with varying degrees of success.  Most of what I've read online talks about how it's a trial and error process and after a few different batches we've settled on these as our favorite for apple chips. 

Normally when drying fruits I have been using a thicker setting on my mandolin, but when going for a "chip" type result the thinner the better.  

All you need to make these tasty little treats are: green tart apples, coconut sugar, and ground cinnamon, and lemon juice.

  1. Wash and remove the stems from the apples.
  2. Slice on a mandolin set to the thinnest setting or slice as thinly and evenly as possible if by hand.  (No need to remove the core but make sure all seeds are removed.)
  3. As the apples are sliced, place them in a bowl with two cups of water and 1 Tbs lemon juice.  Make sure all apples are tossed in the lemon juice water.  (This prevents browning.)
  4. Arrange apple slices evenly on the dehydrator trays.
  5. Mix 1 part coconut sugar with 1 part ground cinnamon and sprinkle over the apples.
  6. Set dehydrator for 135 degrees and dehydrate for 4-6 hours.  If in a hurry set to 165 degrees and they will be done closer to the 4 hour mark.


Instagram Roundup


Sunday, February 9, 2014

Olympic Party Ideas

Baked wonton torches, Greek party food, and fun Olympic photo props!


The Olympics are AWESOME.  I've been watching for two days and I already feel like an expert on skiathlon and biathlon and feel really smart using new terms I've learned two seconds ago confidently in a sentence.  e.g. "Did you see that triple 'cork' that he just pulled out?!  AND he got a double hand grab!!"

We went to an opening ceremony potluck party at our friend Jen's and we wanted to bring all Olympic themed foods to share.  We went the Greek food route for our first two dishes to honor the Olympics origin.  David made a mini vegan gyro station a la these Vegan Gyros.  He made an awesome vegan tzatziki.  So easy to make just by combining plain soy yogurt, garlic, cucumber, and dill.  He set up a little station with pre cut pita, the gyro "meat", and sliced tomatoes and onions.

I made "tofu soulvaki".  I marinated some tofu in a mixture of soy sauce, oil, maple syrup, garlic powder, and cayenne then cut it into long stripes and baked for about 40 mins at 420, flipping over half way through.  After baking, skewer the strips on bamboo sticks to resemble the ubiquitous Greek street food, souvlaki.

But the dish I was most proud of was our baked wonton torches!  Take wonton wrappers and trim one corner into a round edge.  Fold one side over making a cone shape and seal with water.  Tear off a tiny piece of foil and place inside the open end to keep the shape while baking.  Spray with cooking spray and bake between 5-10 minutes at 425 degrees.  These babies crisp up quickly and vary by oven.  Check them after 5 minutes and keep a close eye on them after that.  You want them to be crisp and browned in spots, but not burnt.

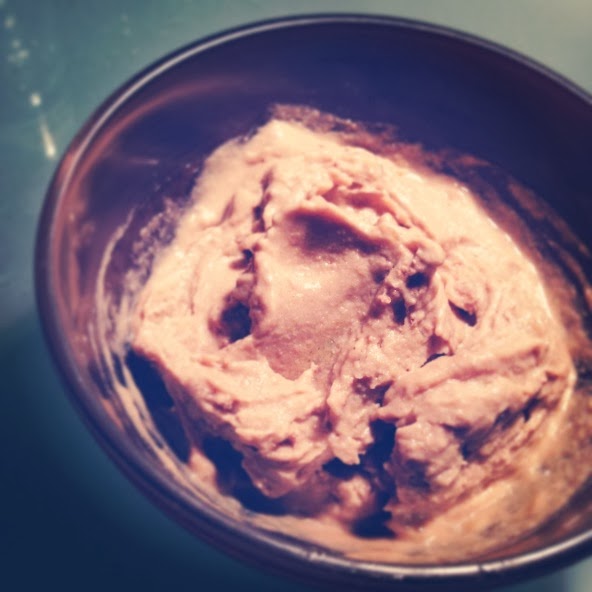
You can fill them with all sorts of different dips or spreads.  I made my Microwave Vegan Buffalo Dip for the filling since it has a orange color so they looked like little lit torches after they were filled!


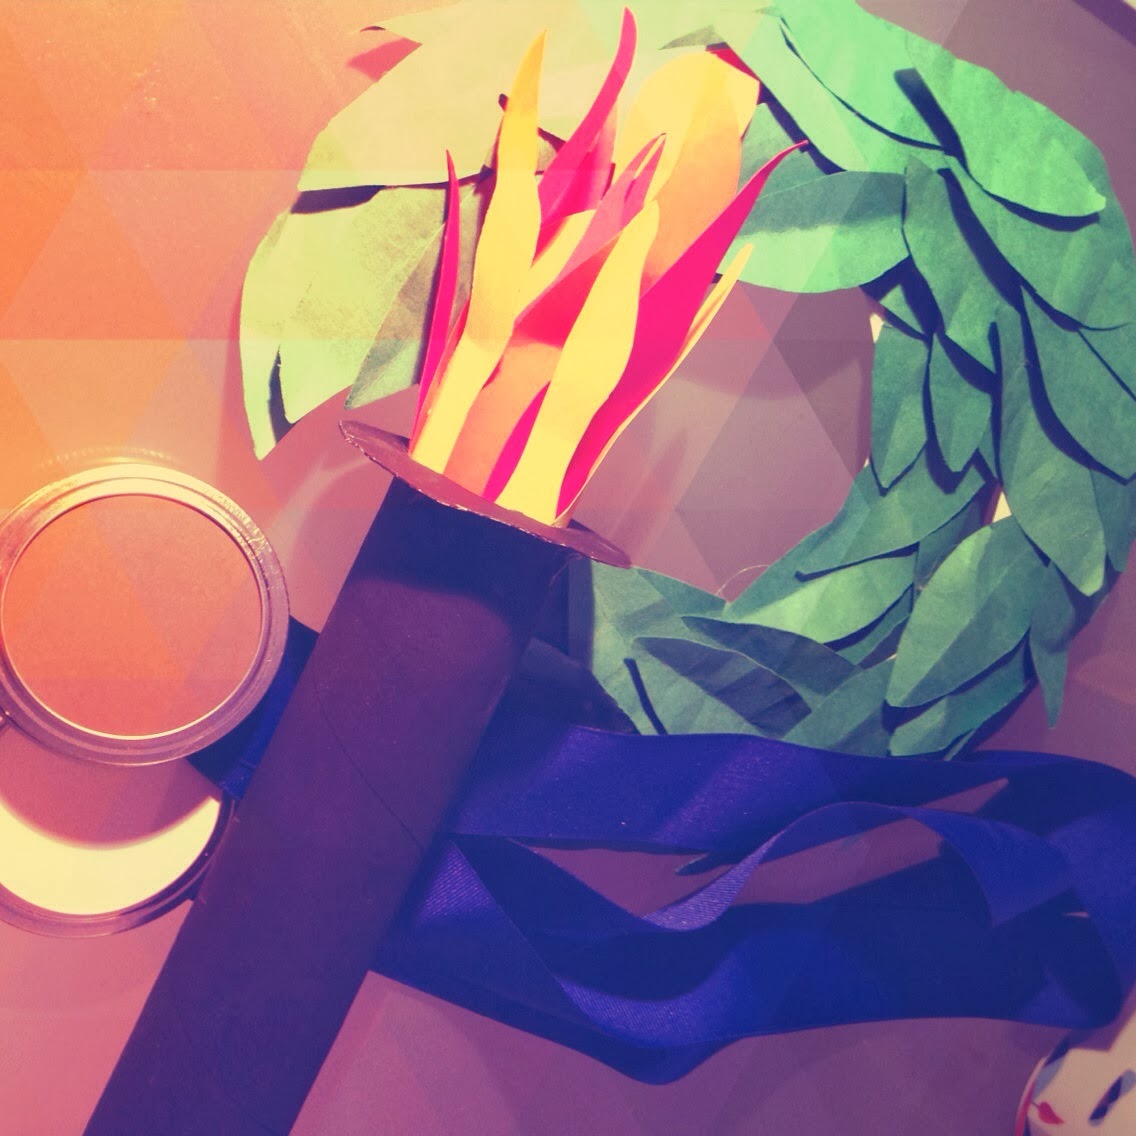
After the success of our Super Bowl photo booth we also crafted laurel victor's wreaths from green construction paper and paper plates, a torch from a paper towel tube, and some medals from mason jar lids and ribbon for fun photo shoots!  Even Sugar was an Olympian!


Thursday, February 6, 2014

Lunch Ideas - Heros and Gyros

Here are two quick and easy lunch ideas.  
Sometimes you just want a big sandwich or a pita, right?  We recently discovered these Pretzel Rolls that Trader Joe's has and we are kind of obsessed with them.  I've had pretzel buns before at restaurants, but these rolls are longer and the perfect shape for a hero type sandwich.  And the best part?  They are only .99 cents each!  Here are two inspirations for your own creations!  (Note: The pretzel rolls contain egg and are not vegan.)

Pretzel Roll Heros

  
The pretzel rolls are very soft so i sliced the roll in half, sprayed each half lightly with cooking spray and grilled on a grill pan until toasted (or toast in toaster oven).  I smeared one half of the roll with a small amount of Vegenaise, added kale, and baked TJ's cripsy chicken less tenders tossed in buffalo sauce (of course) for a buffalo chicken kale hero.  We also tried these rolls with kale, Tofurky Peppered Deli Slices, and a smear of cashew cheese spread. Also delicious.  Try with your favorite sandwich toppings and get creative on these tasty and budget friendly rolls!


Vegan Gyros


David and I spent four never hungry months in the Mediterranean when we were working performing on a cruise ship.  We became obsessed with Gyros which are sold as street food (much like NYC) all over place, but the best ones of course were in Greece.  Gyros are one of the only meat meals that I have craved and missed in my post meat eating life and I think about them longingly and often!  Then one day I saw a vegan gyro product by a company named Viana in Hell's Kitchen's Westerley Natural Market.  I was skeptical but wanted to give it a try and they were amazing!!!!  The seasoning was dead on and the texture was perfect I was so happy


We cooked the gyros strips according to the package, trying to get the edges crispy like the real thing, and toasted pita bread on the stove.  I made a a simple vegan tzatziki the night before with some plain soy yogurt, garlic, cucumber, and dill.  Smear your pita with the tzatziki, place on the gyro strips, and top with some sliced tomatoes and red onion.  If you want a truly Greek experience, top with a few oven baked french fries or potatoes and sprinkle with paprika!

Funky Monkey Vegan Ice Cream


One my best friends, Matt, works for Jeni's Splendid Ice Creams, in Columbus, OH.  If you've never heard of them before, and you are a dairy eater, their ice creams are seriously insanely good.  Like the most ridiculously awesome flavors and REAL ingredients.  It's pretty much the only ice cream that I'll eat anymore, usually had as a special treat when he sends us a goodie package or we are visiting him.  Favorite flavors include Sweet Potato with Torched Marshmallow and Salty Caramel.  One of their newest flavors is Banana French Toast, YES PLEASE!

While trying to prevent myself from going to Dean & Deluca and buying (and eating) a whole pint one day, I started wondering about easy at home vegan options for ice cream as most non-dairy brands are fairly expensive too.

I saw a post on Pinterest last summer when looking for homemade vegan ice cream options that didn't require an ice cream maker.  One post suggested making banana "ice cream" simply by freezing a banana, letting it soften a bit after taking it out of the freezer, and blending it into an ice cream like consistency.  This alone was awesome flavor wise and texturally, but then I started thinking what could make it better.

The perfect match came with pairing the banana with my Chocolate Peanut Butter Cashew Cream.  Cashews, if you couldn't tell, are one of favorite ingredients to get creative with, and they add such a rich, creamy texture to any dish.

The result is SOOOO good and barely takes any effort at all.  The texture is very much like ice cream and the flavors combine beautifully together.  Try topping it with your favorites.  I did cacao nibs!


Ingredients
Serves 1

  1. Slice the banana and mix with 1/4 c   
  2. Add 1/4 c cashew cream to the banana and mix together.
  3. Place in freezer until frozen.
  4. Take out the banana/cashew mixture 20 mins or so before ready to serve and let begin to soften.  
  5. Add just a splash of non-dairy milk to get things going and blend (I used my immersion blender) until a smooth ice cream consistency.  Be sure not to add too much milk or you will end up with something more like a milk shake which isn't bad either!

Craft Time - The Valentine Olympics!


I am a huge fan of the Olympics and am so excited to spend the next two weeks watching anything and everything Olympic related.  Bring on the curling!!!!  It's also a great excuse to try some new snack and appetizer recipes to munch on while we are hiding from the NYC winter outside and watching the games!  I wanted to decorate for Valentine's Day, but also have some Olympic flare as well, so I came up with these Olympic Ring pennant banners.  

I cut triangle "pennants" out of white paper and used toilet paper tubes dipped in paint to create the ring design on each triangle.  I used a metallic gold ribbon to string them together.  I hung some in the picture as shown and put a swag over our kitchen window as well.


As always, whenever decorating for the holidays I refer to the the one and only source for fun, easy, budget friendly crafts, my good friends The Crafty Lumberjacks.  I made this Valentine's "cherry blossom" vase arrangement inspired by their St Patty's Day clover piece.  Looking forward to making that one for next month too!

For the cherry blossoms I used a circle punch to cut out red and pink circles.  I placed two circles side by side without overlapping and stapled across the middle of them.  Bend the staple in half and thread floral wire through one of the "loops" of the staple.

I'm not a very big football fan, but was heading to a Super Bowl party with friends from college. I was trying to think of something to give us a fun activity to do in between the commercials and half time show, which is what I was watching, and crafted these fun photo booth props in the teams' colors from card stock.  So easy, cheap, and provided us with lots of fun!